WWA Info Exchange

For Woodworkers By Woodworkers
It is currently Sun Nov 10, 2024 2:45 pm

All times are UTC - 5 hours


Post new topic Reply to topic  [ 9 posts ] 
Author Message
 Post subject: Back to Boxes
PostPosted: Mon Dec 26, 2016 2:51 pm 
Offline
Veteran
User avatar

Joined: Mon Apr 11, 2005 12:01 am
Posts: 4951
Location: Seattle, WA, USA
Hey Folks,

For Christmas presents this year, I made some stationery boxes. You know, old fashioned, analog pen and paper communication devices. Anyway, I couldn’t tell you much about them, at the time, because I wanted to preserve the surprise. Now that it’s Boxing Day (heh, heh), I can tell you about them.

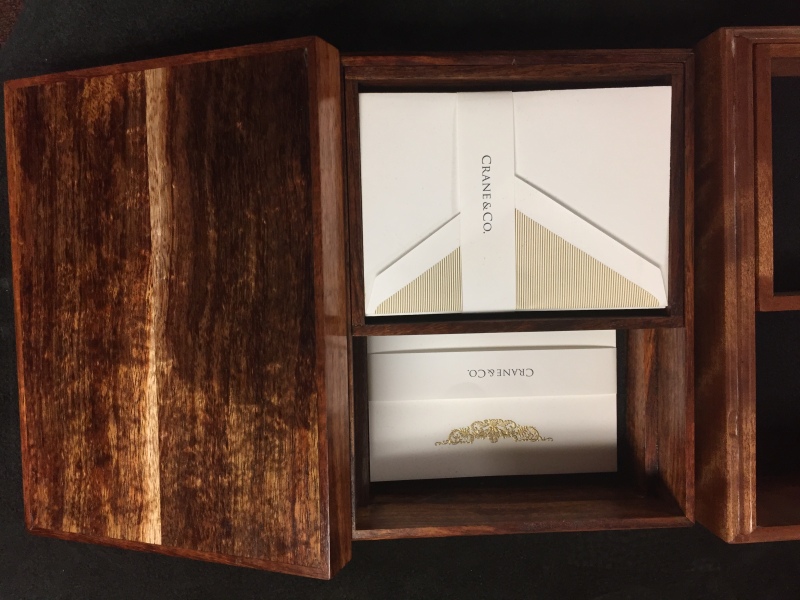
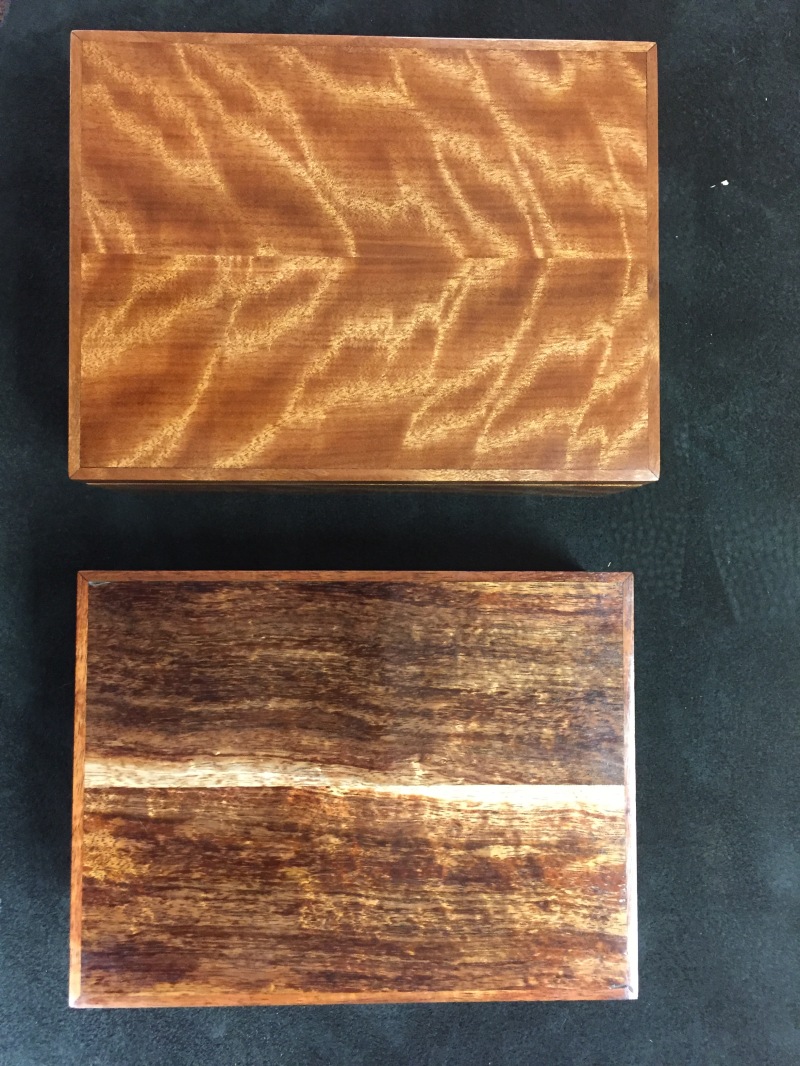
I typically make these boxes out of whatever offcuts I have around the shop. But in the case of one of them I have been saving the wood for nine years. Nine years ago, I built a small chest, out of Hawaiian Koa, for my god-daughter. I’ve kept the offcuts hoping to come up with a good project for them, and decided this was the one.
Image

The other box (top of the photo below) is for her sister, and is made of offcuts from the African Makore table that I posted about earlier this year.
Image

Both boxes are simple mitered corner construction with runners for a small till for envelopes, etc. The runners, and recessed top and bottom panels, reinforce the mitered corners, and a good hide glue holds it all together. Finish is a wipe on polyurethane.

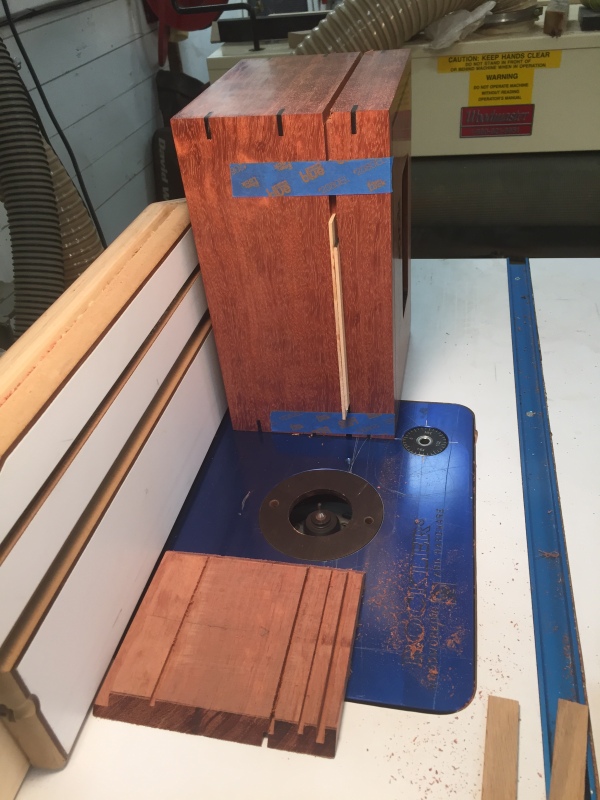
The boxes are made all of one piece, with a dado cut into the inside length of each side piece. Once the box is assembled, I cut an intersecting dado along the outside of each side and a telescopic lid results. A reserved key piece made prior to assembly allows for a precise location of the last cut.
Image

As a gag, I included the following, Thank-you Note Template, in each box. It’s totally unneeded in this case however, as both young ladies are conscientious writers.

THANK YOU TEMPLATE*

DEAR (RECIPIENT), (TODAY’S DATE)

THANK YOU SO MUCH FOR THE (GIFT), I ABSOLUTELY LOVE IT. IT IS (INSERT GRATUITOUS HYPERBOLE, E.G., “THE BOMB”).

(RELATE SOME RECENT INTERESTING, HUMOROUS, AND/OR SIGNIFICANT EVENT IN YOUR LIFE).

(INCLUDE A SINCERE WISH FOR A GET TOGETHER AT SOME FUTURE OPPORTUNITY).

WITH LOVE,

(YOUR NAME HERE)

(INCLUDE OPTIONAL AFFECTIONS, E.G., 00XX, HUGS AND KISSES, ETC.)

*TO BE HAND WRITTEN


Although I enjoy making boxes, particularly as gifts, it’s time to get started on furniture again.

Cheers,
Tom

_________________
"There is no path to peace, peace is the path."
Mohandas K. Ghandi
Image


Top
 Profile  
 
 Post subject: Re: Back to Boxes
PostPosted: Mon Dec 26, 2016 6:58 pm 
Offline
Veteran
User avatar

Joined: Sat Jan 14, 2006 10:44 am
Posts: 3951
Location: Skagit Co WA
Gotta love the thank you template!

_________________
Nullum Gratuitum Prandium

Cheers - Dennis


Top
 Profile  
 
 Post subject: Re: Back to Boxes
PostPosted: Tue Dec 27, 2016 8:23 pm 
Offline
Veteran
User avatar

Joined: Mon Jul 11, 2005 12:01 am
Posts: 4264
Location: Linwood, Ma, USA, The Center of the known universe
Nice Tom, real nice.


Top
 Profile  
 
 Post subject: Re: Back to Boxes
PostPosted: Sun Jan 29, 2017 2:19 pm 
Offline
Veteran

Joined: Thu Sep 14, 2000 12:01 am
Posts: 699
Beautiful...BUT...if the top panels are solid and tight in their dado's ....what about wood movement? I am always fearful of a top/ bottom expanding/contracting and ruining such a fine piece....


Top
 Profile  
 
 Post subject: Re: Back to Boxes
PostPosted: Sun Jan 29, 2017 2:35 pm 
Offline
Veteran
User avatar

Joined: Mon Apr 11, 2005 12:01 am
Posts: 4951
Location: Seattle, WA, USA
Hey Alan,

In the box shown on the router table, the top panel is floating. In the other two boxes, the panels are thin enough that they don't shrink enough to be a problem. Also, the panel pieces are quarter sawn, so they won't shrink much anyway. In all cases, the bottom piece is plywood.

To be honest, I usually use this technique for recipe box sized pieces. This is the first time I've done this for something as large as a stationery box. They were made in humid Seattle, and one is going to Oakland, while the other is going to Edmonton, Alberta.

Time will tell.

Cheers,
Tom

_________________
"There is no path to peace, peace is the path."
Mohandas K. Ghandi
Image


Top
 Profile  
 
 Post subject: Re: Back to Boxes
PostPosted: Sun Jan 29, 2017 3:09 pm 
Offline
Veteran

Joined: Thu Sep 14, 2000 12:01 am
Posts: 699
tms wrote:
Hey Alan,

In the box shown on the router table, the top panel is floating. In the other two boxes, the panels are thin enough that they don't shrink enough to be a problem. Also, the panel pieces are quarter sawn, so they won't shrink much anyway. In all cases, the bottom piece is plywood.

To be honest, I usually use this technique for recipe box sized pieces. This is the first time I've done this for something as large as a stationery box. They were made in humid Seattle, and one is going to Oakland, while the other is going to Edmonton, Alberta.

Time will tell.

Cheers,
Tom

Tom...I built a nice 4 drawer jewelry box for a friend... It was years ago, and I was/am a stickler for details. I built it with tight tolerances. Well, summer came in NY and the drawers would not open...swelled just enough to stick. I had to put it in my refrigerator until it shrank and I could plane it. SO...now you see why I ask. I hate re-doing a piece. I have some nice scraps around and they would be great for some boxes. Again...yours are super....thanks for the details.


Top
 Profile  
 
 Post subject: Re: Back to Boxes
PostPosted: Sun Jan 29, 2017 8:16 pm 
Offline
AdminDude
User avatar

Joined: Mon Sep 04, 2000 12:01 am
Posts: 15397
Location: Maui,Hawaii
Beautiful boxes, even better template.

I wonder if I put stuff in the refrigerator instead of taking it out. would I shrink?

_________________
Mango
The land some where in the middle
20 47 00N -156 26 00W
Image


Top
 Profile  
 
 Post subject: Re: Back to Boxes
PostPosted: Wed Feb 01, 2017 6:59 pm 
Offline
Veteran
User avatar

Joined: Tue Oct 19, 1999 12:01 am
Posts: 1733
Location: Crivitz, WI
I'm always afraid to cut the tops off of boxes.
What is your method(s)?

Thanks

_________________
Sean

Countin' flowers on the wall,
that don't bother me at all,
smokin' cigarettes and watchin' Captain Kangaroo,
Now don't tell me I've nothin' to do.

Second recipient of the D'oh Award. 4-13-08


Top
 Profile  
 
 Post subject: Re: Back to Boxes
PostPosted: Wed Feb 01, 2017 8:13 pm 
Offline
Veteran
User avatar

Joined: Mon Apr 11, 2005 12:01 am
Posts: 4951
Location: Seattle, WA, USA
Hey Sean,

The last photo in my first post shows the cutting off of the lid, using a router table and a 1/8" bit. I usually use a 3/8" bit, to create a longer telescope, as described in the text. In this case, it was a hinged lid, so I wanted a shallower lip, just a dust seal really.

Shims and tape keep the box properly registered while finishing the cut. If you study that last photo, you will see that the story board on the table shows the orientation of the cut from the outside, with the cut on the inside prior to assembly. Together, they form the telescope/dust seal.

BTW- No matter how many times I've done this, I too am always anxious until I find the edge of the interior cut. :shock: The trick is to sneak up on it very slowly, so that you get a nice, nearly air tight fit.

Good luck,
Tom

_________________
"There is no path to peace, peace is the path."
Mohandas K. Ghandi
Image


Top
 Profile  
 
Display posts from previous:  Sort by  
Post new topic Reply to topic  [ 9 posts ] 

All times are UTC - 5 hours


Who is online

Users browsing this forum: No registered users and 17 guests


You cannot post new topics in this forum
You cannot reply to topics in this forum
You cannot edit your posts in this forum
You cannot delete your posts in this forum
You cannot post attachments in this forum

Search for:
Jump to:  
Powered by phpBB® Forum Software © phpBB Group